
Best Service to Offer Your Client as a New Bookkeeper
When you're just starting out as a bookkeeper, there is one important service you should provide to your client. This service is made up of three monthly tasks: categorizing, reconciling, and sending reports. Together we will take a closer look at this essential and simple service that you can offer any small business owner. I will show you how to complete each task in QuickBooks Online and prepare you to work with your first couple of clients!
Watch the video here, or keep reading!
How to Categorize in QuickBooks Online
All of the money going in and out of your client’s bank account needs to be put in a category. These categories are found in the chart of accounts. Any time your client spends money on rent, it needs to go in the rent category, and any time they spend money on office supplies, that transaction needs to be placed in the office supply category. Categorizing each transaction will help you in the end with our 3rd simple service of sending reports.
Here’s how you’ll do this inside QBO:
#1 - Link Your Client’s Bank Account
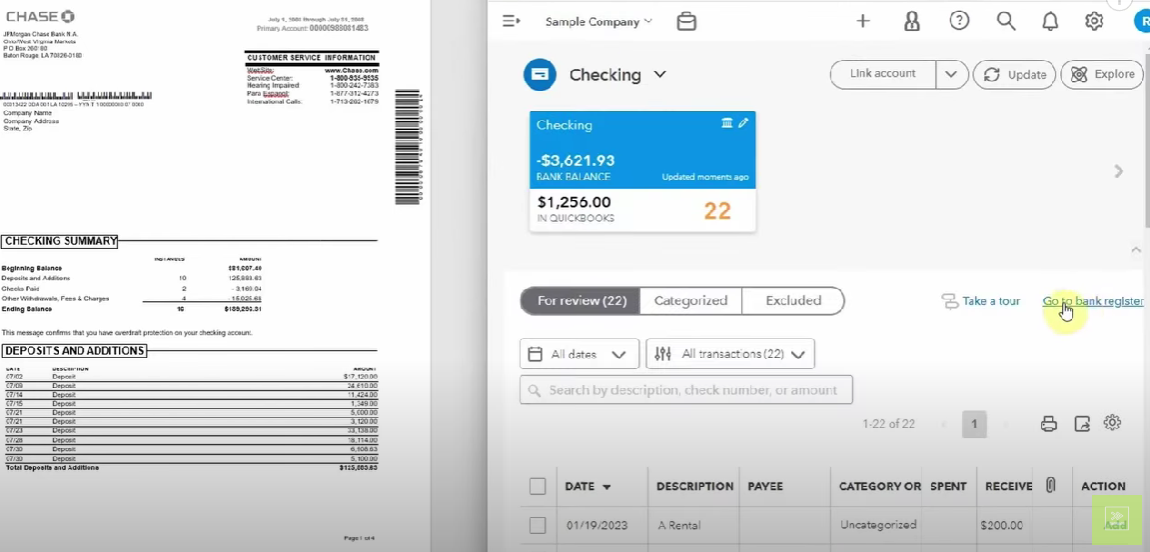
To start, click on the “Banking” tab. If this is a new client, you’ll be prompted to link your client's bank account to QuickBooks Online. You may need your client’s help with this. I recommend that your client gives you access to make your own password, this way you will not be as reliant on your client when you need to access their transactions in the future. You can also add an account by clicking on “Link Account.” Find your bank and follow the prompts to log in to your client’s bank account.

During this portion of the set up, you will select the dates for how far back you want to import into QuickBooks. Some banks will allow you to import up to a year's worth of transactions, while other banks will only allow you to download 3 months.
If it is the shorter amount, an option is to download the transactions into an excel document (.CSV) and then upload it into QuickBooks. Once your account is linked, QBO will download all of the transactions for you.
If you have a new client and their books are messy or you’re catching up a large chunk of time, check out my videos on “clean ups” and “catch ups”!
#2 - Check the List of Transactions
Now you are going to have a list of transactions on your screen. The main thing you want to focus on is the category; this tells QuickBooks where to put your expense on the profit and loss report. You will also want to note the “bank detail”; this is what it says on your bank statement.

#3 - Add a Vendor
If QuickBooks does not recognize the vendor, you will want to add one. In order to add a vendor, type the name of the vendor you want to add in the Vendor/Customer box and click “add”. Next, select the category you want the transaction to be placed in and click the green “add” button at the bottom right corner of the screen.

#4 - Finalize the Transaction - Categorize
The transaction is now officially in your QuickBooks account!
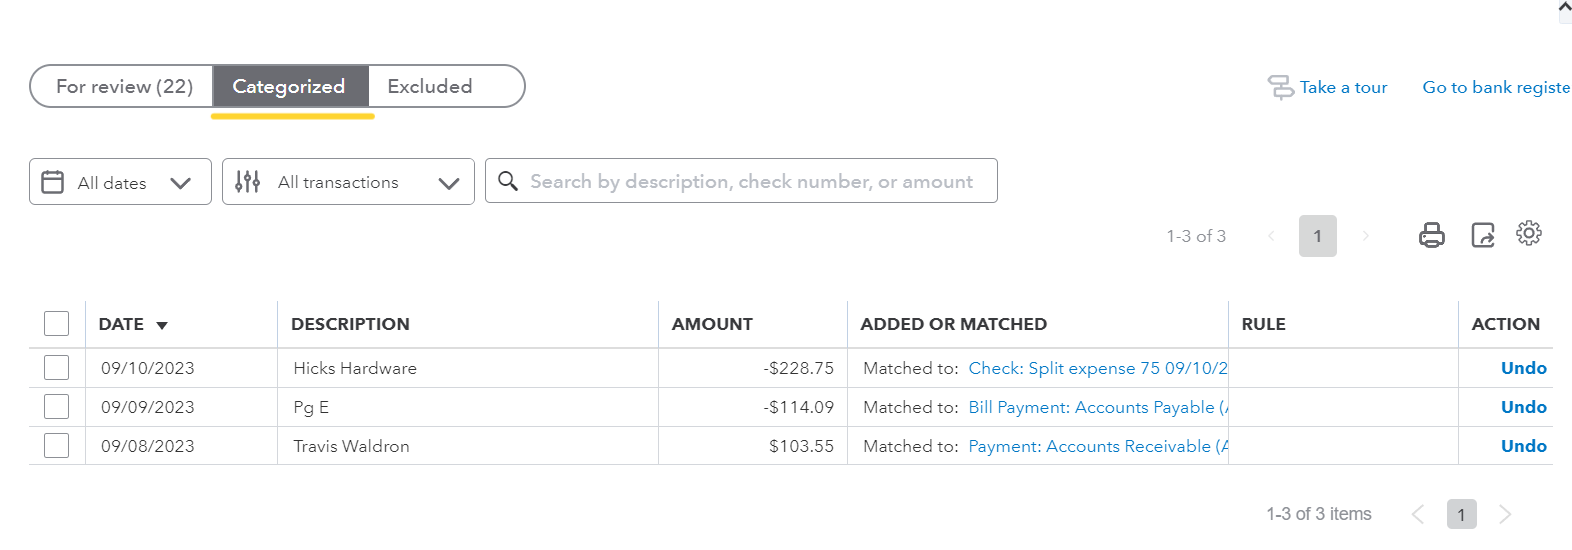
If this vendor has already been added to QuickBooks, QuickBooks will know and categorize the transaction for you. All you have to do is approve the transaction by selecting “match.” While reviewing transactions, if you see that all the information listed on the transaction is correct, you can click the box on the left and accept multiple transactions at a time.

Click on the Categorized tab to see all of your transactions that have been approved and categorized in QuickBooks Online.
RELATED: Tips for BANK FEEDS in QuickBooks Online
How Often to Categorize
How often you categorize will depend on the client and how many transactions per month they have. If it is a really big client and they have 100’s of transactions, I typically do them each week to stay caught up. With smaller clients I categorize at the end of the month, right before I reconcile and send the monthly reports.
Reconcile
After you categorize all of the transactions, you are going to reconcile the bank account or credit card. This will ensure everything in QuickBooks is correct and matches what is in the account. This task is completed at the end of the month and is done right before you send your clients their reports.
How to Reconcile
With your bank statement in front of you, go to the banking tab in QBO. Click on the bank register link. The bank register will show you all of the transactions that have been approved in QuickBooks Online.
Click the reconcile button in the top right corner of your screen and select what account you want to reconcile. You want to make sure the “Beginning balance” matches the beginning balance on your bank statement. Next, enter the “Ending balance” and the “Ending date” and start reconciling.

Now you have reached the reconcile screen with all the transactions that are in QuickBooks. To start reconciling, you are going to compare the categorized transactions in QuickBooks Online to the bank statement. QuickBooks is pretty smart and will preselect all of the transactions that it thinks are correct.
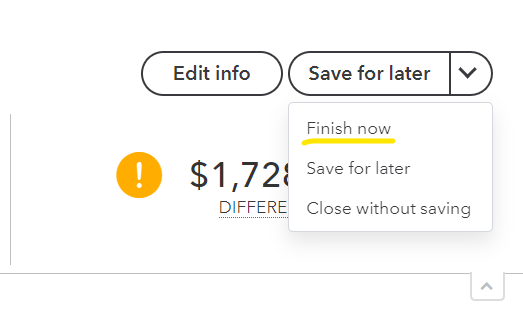
The goal is to make the “Difference” amount at the top of the screen, $0. This means that everything that is in QuickBooks is also in the bank. If the amount is $0, I trust QuickBooks and I complete the reconciliation.
If you have a discrepancy, you need to figure out what’s wrong and go through each individual transaction, checking them off in QuickBooks as you go. Once you have checked all of the transactions with the bank statement, your “Difference” amount will be $0 and you can click “Finish now” to complete the reconciliation. This will produce a report and in the bank feed all of the transactions will have an R by them, showing that they have been reconciled.
Why Do You Reconcile?
A common question I get is, “If QuickBooks is connected to the bank feed and everything is automatically feeding in from the bank, shouldn’t it be perfect all the time?”
Yes, in a really simple business this might be true, but once you start adding more complex services, there will be more moving parts and more things that can go wrong. If you are entering invoices or checks, there’s a chance for human error, maybe the client made a mistake, or the bank check reader read the check wrong.
Reconciling is a good habit to get into now when you are working with simpler businesses. This will alleviate some of the stress later on.
Send Reports
At the end of each month, you will send your client a profit and loss report and a balance sheet. I like to customize the reports in QuickBooks in order to make the data as clear as possible for my client. You can do comparisons to previous years or you can pull reports of small categories. You can draft an owner’s draw to see how much money your client is taking home in their own paycheck (assuming they are taking distributions and not a salary). When creating reports in QuickBooks, the options are limitless!
How to Create Reports
The first thing you’ll want to do is head to the “Reports” tab. The most common reports that bookkeepers pull for their clients are Accounts Receivable Aging Summary (money not yet paid to your client), Balance Sheet (equity, owner’s draw, investments, and money in their bank account), and Profit and Loss. Click on the report that you want to pull and edit the information at the top of the screen to reflect the data your client is requesting.
From here you can easily email the report to your client, print the report, save it as a .pdf, or download it into an excel document. If you changed the filter on the report, you can also save the customization in order to easily pull the same report next time. If you want the report to be sent to your client on a certain date every month, you can schedule it so you don’t have to go in and do it manually.
My clients enjoy being able to compare months, so I usually pull the monthly Profit and Loss over the past year to see how much money the client made each month. Play around with the reports and have fun with the data to see what kind of story you can tell to your client about their business.

If you’re looking to find your first couple clients to provide this essential bookkeeping service to, check out my course, Bookkeeper Marketing Coach. I will walk you through how to create a marketing plan and provide you with creative ways to network with your local community, as well as, establish an online presence. I also show you how to successfully onboard your new clients, so that you are ready and prepared to start categorizing, reconciling, and sending reports!